
Photographing Snow & Winter Scenes


Before you begin the push along snow trails and frozen lakes there are some tips and tricks to bear in mind. First, I’ll go over how to prepare for shooting outside in cold weather, while keeping your camera equipment safe. Then, I’ll let you in on how to shoot properly exposed scenes, even if the bright sun and snow are plotting against you and your camera. Finally, I’ll provide a few ways to compositionally take advantage of the snowy scenery to turn “snapshots” into fine photographs.
(Lens) Baby it’s cold outside
Whether you turn off your warm car or step outside your front door, the first things you should consider are the temperature and weather conditions. Of course you’re going to be covered from your hat to your boots, but what about your camera? One of the first problems encountered while shooting in cold weather is your camera battery’s temperature—the colder it gets, the less charge it provides. Try to keep your camera warm by holding it close to your body, and keeping any spare batteries in a warm pocket or pack.
Now that your batteries are snug and out of the cold, your camera lens is fogging up and you can’t see a single thing through it! Don’t panic. Your precious glass and camera must first acclimate to the colder temperature. It’s the same as your car windows fogging up. Simply leave the camera around your neck, in a bag, or on a tripod for a few moments to equalize the air in and around it. The goal here is to safely allow a gradual temperature change rather than an abrupt drop that could cause permanent damage to equipment, like cracked LCD screens or condensation in lenses. This also gives you a chance to look around and note anything you may be interested in shooting under the fresh blanket of snow.

Blinded by the light
Anticipate your camera underexposing a bright wintry scene and compensate for it.
Now that you’re prepared for the cold, you are free to wander this winter wonderland shooting breath-taking snow vistas, right? Nope. Now you have to prevent all of that powdery fluff from fooling your camera’s settings. The light meter doesn’t know you’re aiming at snow, it only knows that it is very bright, so it will tone down the exposure. The first thing you’ll notice in your shots will be both dull grey snow and dark silhouetted trees, or bright white and over blown snow with little detail left standing. The rule of thumb to remove the dull grey snow look is to compensate for the bright scene by manually “opening up” your aperture (f/ stop) one or two stops, or slow your shutter speed in order to get your camera to over-expose the scene and brighten that dull grey snow. If your camera has an exposure compensation meter, experiment with +1 or +2 to see which of them gives the best result in a given situation.
You may also opt to use a “Snow/Sand” scene mode on some cameras, rather than manually compensating the exposure. The opposite is recommended if your image is already over-exposed and highlights are blown out (become pure white and lose detail). Turn things down a bit to bring detail back into the snow and surrounding areas, but not enough to make the snow grey and dull. Snow should show a degree of texture, to make it realistic and help the viewer feel that they can crunch through it with a pair of boots. Some of us in the lake-effect region can take a look at a detailed photo of snow and almost tell if it can pack a good snowball.
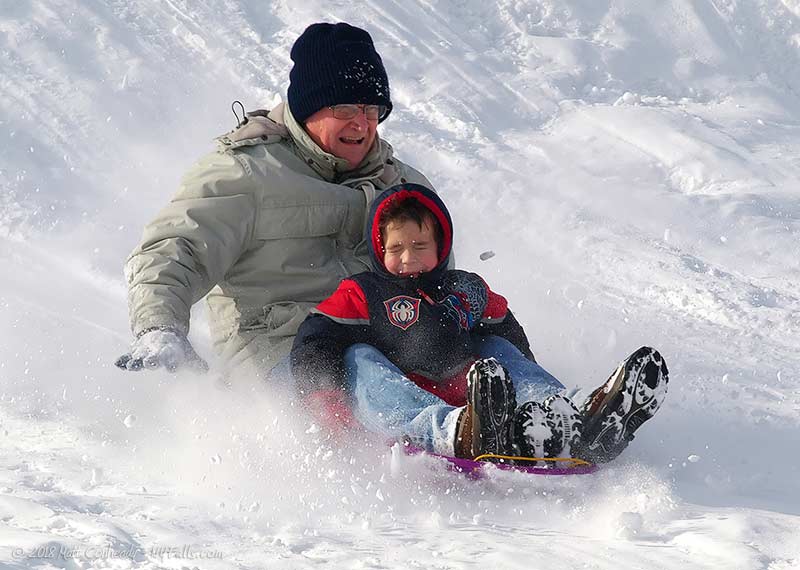
This method changes if you are shooting people while out in the snow. Instead of using the snowy scenery to gauge your compensation, concentrate less on the snowy scene and more on the exposure, or light reflecting, off of their face(s). Once set you can shoot from any angle and still keep proper exposure of their smiling faces. You may lose detail in the snow if you aren’t bracketing exposures, similar to HDR photography, but that’s a whole other technique. If you cannot get close enough to their faces to get an accurate reading, just take a glove off and use this technique on your bare hand. As long as the skin tones and lighting are similar enough you should be able to get accurate shots of children careening by on a sled that otherwise would have been difficult to do on the fly.
Phone Tip: iPhones and Android devices make it easy to adjust the exposure of a scene, but it’s hidden at first. Compose your scene then tap the +/- button near the shutter on modern iPhones. Some phones require a tap on the scene to show exposure controls. Then slide to the proper exposure so the snow is bright, but not too bright.

Top: The camera’s auto settings picked up on the reflections on the snow and ice and turned down the exposure, resulting in a dark image, the most common problem with winter scenes. Bottom: using exposure compensation, or the camera’s built-in “snow” or “sand” setting helps offset the exposure.
Blue Christmas
To keep your images from looking like every other blue snow photo, the white balance you choose is vital. To accurately capture the white snow the way your eyes see it, you will need to help your camera out, because once again the snow is trying to fool it. The higher amounts of UV rays reflected by the snow tend to give off a blue hue in your camera, and most of the time the camera presets (Auto, Day, Cloudy, Tungsten, etc.) cannot handle it. To set the correct white balance, just point the camera to a clean patch of snow and use the Snow/Sand or Custom/Manual white balance settings on your camera. Take a couple of test shots to gauge how things change as you change these settings. Once set, the proper balance of colors will remain in your photos for your entire session, or at least until you find a dramatically different scene. In that case just repeat this step and continue shooting! A lot of this can also be done in the post-processing of images, especially using RAW file converters. However it is always recommended to have things set correctly while you shoot, because it can be hard to drastically correct things after the fact.
This is not to say that achieving a pure-white image is always the best, or the only way to do it. However by controlling colors and white balance you can be in charge of exactly how your images come out. Using cool blue tones will make your image chilly, while warm yellows and oranges will warm it up.
Phone Tip: Most Android devices and iPhones have controls for white balance. Often they are hidden behind the settings button.


How much blue is too much?


On the left, a cool white balance leaves the snow looking too blue. Second, a cool, but more neutral white conveys the coldness of the scene. Third, a neutral white often looks dull and unrealistic, but serves to increase color contrast in a scene. Lastly, a warm white balance can convey warmth, but can often make snow look muddy. Since snow reflects the light that shines on it, its natural color should have a tint from the sky or objects above it. In this case, a little brown from the trees is a more natural selection. A setting in-between the third and fourth may be best.
Silver and cold
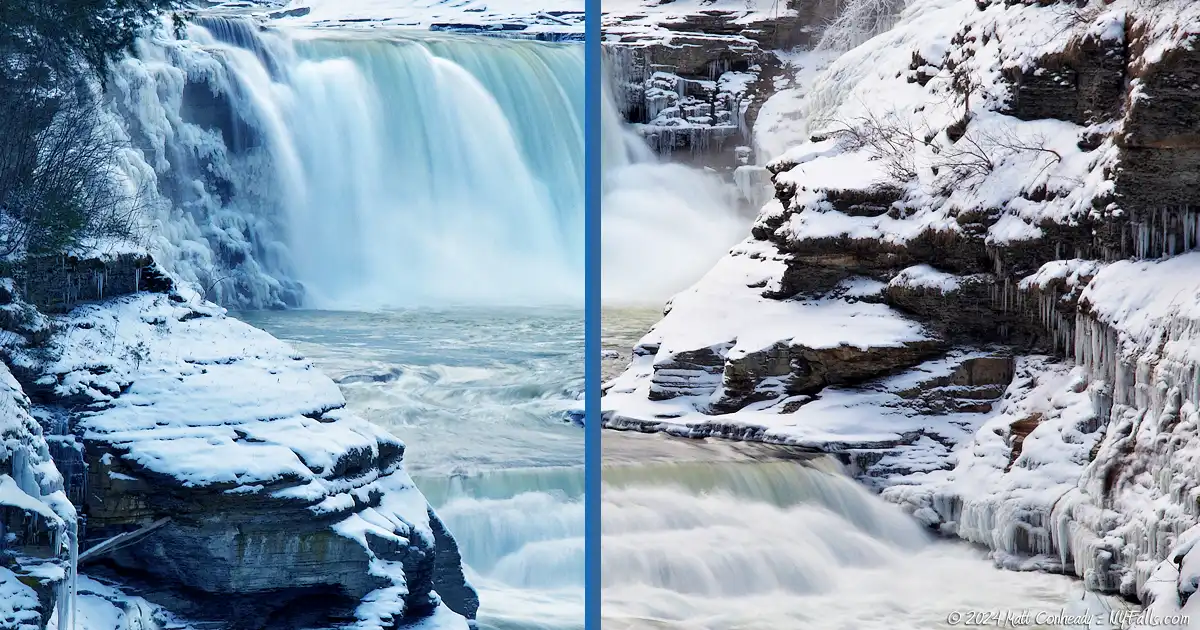
Just as with any other time of year, the “golden hours” to shoot remain the same—early morning or late afternoon. Now that the days are shorter it’s even easier to wake up before sunrise! Right? Having the sun at a right angle to your subject casts long shadows on otherwise flat scenes, or adds contrast that may not have been there if the light were overhead. The golden glow of sunrise or dark reds and purples of sunset can add a dramatically different tone to your shots. Try to shoot just after a snowfall to ensure that you find dramatic snow drifts and glassy icicles before they have a chance to be disturbed or melted.
Though the idea of shooting a pristine, undisturbed snowy field sounds good in theory, it may fall flat in a photograph. Take note of objects that differ from the background adding color or contrast to a scene and try to incorporate them. Colorful sleds, gloves, hats, cars, berries, etc. could all add an interesting subject to a beautiful scene. Fences that lead viewers into your image or trails left by animals or sleds also help your composition immensely. They may also add emotional weight and connections to viewers that further elevate your image from what may have otherwise been considered a winter snapshot.
You’re a mean one, Mr. Flash
An uncontrollable flash can disrupt a shoot in any weather. With winter photography your flash can be used in very unique and targeted ways to produce wonderful results. Experiment with different flash settings for dramatically different effects. If you choose a basic high-speed or pop-up flash you will stop snowflakes in mid-air and capture the snowfall in an instant, yet it may unintentionally darken the background if not appropriately compensated for. Using a strobe lamp with a slow shutter speed will capture snowflakes at specific points in their descent, creating very interesting dotted effects. A fill flash 2nd curtain or slow-sync flash, with a slow shutter speed, will show the sweeping fall of the flakes, followed by a quick flash to freeze them at the last instant. Of course if you’d rather remove the snowflakes and show the beautiful sights beyond, just use a longer exposure and they will be much less noticeable.
Christmas without you
You never want to lose your beloved camera or lenses after all of the wonderful winter scenery you just captured together. Now that you have weathered the blistering winds it’s time to get back home to that hot chocolate. Just as when you left the cozy house or warm car, your camera will need to gradually re-adjust to the change in temperature. Pack it back up in a camera bag or large baggy and let it acclimate slowly to avoid condensation and damage once again. Keep a few of those silica gel packets often found in shoeboxes and packed in vitamins. These packs absorb moisture. Keeping them in your sealed camera bag with your gear as it warms up form the outdoors will help prevent dangerous condensation that will cloud up the inside of a lens and ruin the image quality indefinitely.
I saw Mommy processing Santa Claus
The post-processing can be done by the chimney with care, in hopes that a Wow-factor would soon be there. As with most photos the common aspects to address are exposure, white balance, and sharpness. Use a white balance that gives the image the proper mood you are seeking to achieve. Levels or Curves can further brighten up dull snow, but making sure to keep sunlight and bright clouds a little brighter than the snow. Of course like anything else, rules have exceptions, so experiment on your own and have fun with developing your own style of processing your images.

Quick tips for winter shooting
- Don’t panic if your batteries drain fast or lens fogs up. Keep the batteries warm, and let your lens get used to the cool air.
- Keep an eye on your camera’s exposure settings to keep detail in the snow and also make it look as bright as it should be, depending on the scene.
- Use white balance and color casts to give a certain mood or look to your photo.
- Capture quiet early morning sunrises or cool winter sunsets to get the best, most dramatic lighting.
- Keep things interesting by composing your photos with an intentional subject, drawing viewers in, or experiment with different shutter speeds and flash settings.
- You can find more tips in our Photography Tips Discussion.
Now that you’ve got these helpful tips for winter photography, leave the hot cocoa for later and grab your boots!
